IPv6 on Yundera
Public IPv6 Addresses for Customer VMs
How to give each customer VM a public IPv6 address
Starting Point
This tutorial assumes that a working proxmox cluster has been set up, according to the instructions in the main setup guide
In particular, we assume:
+ Servers are running on Scaleway Dedibox
+ Multi-node Proxmox cluster is up and running
+ Regular IPv4 internet access on VMs is provided through a ‘simple’-type SDN zone, with appropriate VNets and Subnets.
Scaleway Network Config & Background Knowledge
Reference:
+ https://www.scaleway.com/en/docs/dedibox-ipv6/how-to/request-prefix/
+ https://www.scaleway.com/en/docs/dedibox-ipv6/how-to/create-subnet/
Scaleway provides us with a /48 IPv6 block per account.
From that, we create a /56 subnet using the Scaleway Dedibox Console.
(We will eventually route this /56 subnet to one of the proxmox nodes. At the end, client VMs will get IPv6 addresses on a /64 block within that /56 subnet.)

Scaleway says wait up to 30 minutes for this action but creating /56 subnets is basically instantaneous in my experience.
The DUID is essentially a password to demonstrate to the Scaleway router that we are authorized to use that IPv6 block.
Specifically, the gateway node (node-0 in this example) uses dhclient to send the DUID to Scaleway’s router. The router then authorizes this node and routes all requests to the specified /56 block to the gateway node. The gateway node routes all outgoing requests to the link-local address of Scaleway’s router. With that bi-directional routing configured, we achieve IPv6 connectivity.
At this point, the gateway node is free to hand out addresses within this /56 block.
In IPv4 land, DHCP is a common way to do this - the gateway node would run a DHCP server, and then machines that join this network would ask the DHCP server for an IP address.
In IPv6 world, however, things are a bit different. We use Stateless Address Autoconfiguration (SLAAC): First, we carve up the /56 block into a /64 block (/64 subnet is a requirement for SLAAC). Then, we run radvd on the gateway node, which sends out Router Advertisement (RA)messages out on that /64 block network. Machines that join this network are expected to listen to these RA messages which contains various metadata and then pick an IPv6 address for themselves. Through IPv6’s Neighbor Discovery Protocol (NDP), the newcomer ensures that there are no address collisions.
Since public IPv6 assignment via SLAAC has been supported in Linux kernel for a long time, there are almost no changes to the VM, except for activating the newly added IPv6 interface.
This guide assumes that IPv4 internet is supplied to each VM (albeit with a private IP address) through a ‘Simple’ type SDN zone and corresponding subnet. All modifications in this document do not interfere with the IPv4 stack. A new, unrelated SDN zone and corresponding subnet are created for the IPv6 stack.
Gateway Node Setup
1. Enable DHCPv6-PD to authenticate Prefix Delegation
Reference: https://www.scaleway.com/en/docs/dedibox-ipv6/quickstart/#how-to-configure-the-dhcpv6-client
We are going to tell the Scaleway router that the /56 block should be routed to this server.
The way we do this is by running dhclient with the DUID configured for the /56 subnet created in the Scaleway console.
Edit /etc/dhcp/dhclient6.conf as follows, replacing:
+ DUID with the actual alphanumeric string found in the Scaleway console, corresponding with the /56 block that we have chosen to use. For this example, we picked 2001:bc8:3021:900:: /56.
+ eno1 with the actual interface that goes to the internet.
interface "eno1" {
    send dhcp6.client-id DUID;
}
To enable automatic start of the DHCPv6 client during system boot, a systemd service is required.
Create a new file called /etc/systemd/system/dhclient.service:
[Unit]Description=dhclient for sending DUID IPv6
After=network-online.target
Wants=network-online.target
[Service]Restart=always
RestartSec=10
Type=forking
ExecStart=/sbin/dhclient -cf /etc/dhcp/dhclient6.conf -6 -P -v eno1
ExecStop=/sbin/dhclient -x -pf /var/run/dhclient6.pid
[Install]WantedBy=network.target
Enable and start the service:
systemctl enable dhclient.service
systemctl start dhclient.service
Once this is configured, we can manually set the IPv6 address of the server itself to anything within the /56 block and it will work.
2. Enable IPv6 Connectivity for the Host
Manually Attach IPv6 Address for Gateway Host.
Since the whole /56 block is now routed to this server, the static IP of the server can be set by ourselves manually in /etc/network/interfaces to be anything within that /56 block.
But first we need to set the the link local address of the router as the default gateway.
Install ndisc6:
apt install ndisc6Then run:
rdisc6 -1 eno1Observe the last line starting with from. It should start with fe80:.
In our example it is: fe80::2e5a:fff:fe16:973b
Suppose the /56 delegated block is: 2001:bc8:3021:900:: /56. That means that the server will have IPv6 internet connectivity as long as we manually set any IP between:2001:bc8:3021:900::1 and 2001:bc8:3021:9ff:ffff:ffff:ffff:ffff.
However, by convention, we limit it to the first /64 block (The convention is that the first /64 block is for network/infrastructure. We’ll use the second /64 block for actual client VMs). Therefore we should set the IPv6 address of the gateway host to between 2001:bc8:3021:900::1 and 2001:bc8:3021:900:ffff:ffff:ffff:ffff.
We’ll use 2001:bc8:3021:900::1 in this eample.
Suppose that the interface from which we have IPv6 connectivity is called eno1.
So, in our example, the address is: 2001:bc8:3021:900::1/64, and gateway is fe80::2e5a:fff:fe16:973b.
Proxmox GUI makes it convenient to set this:
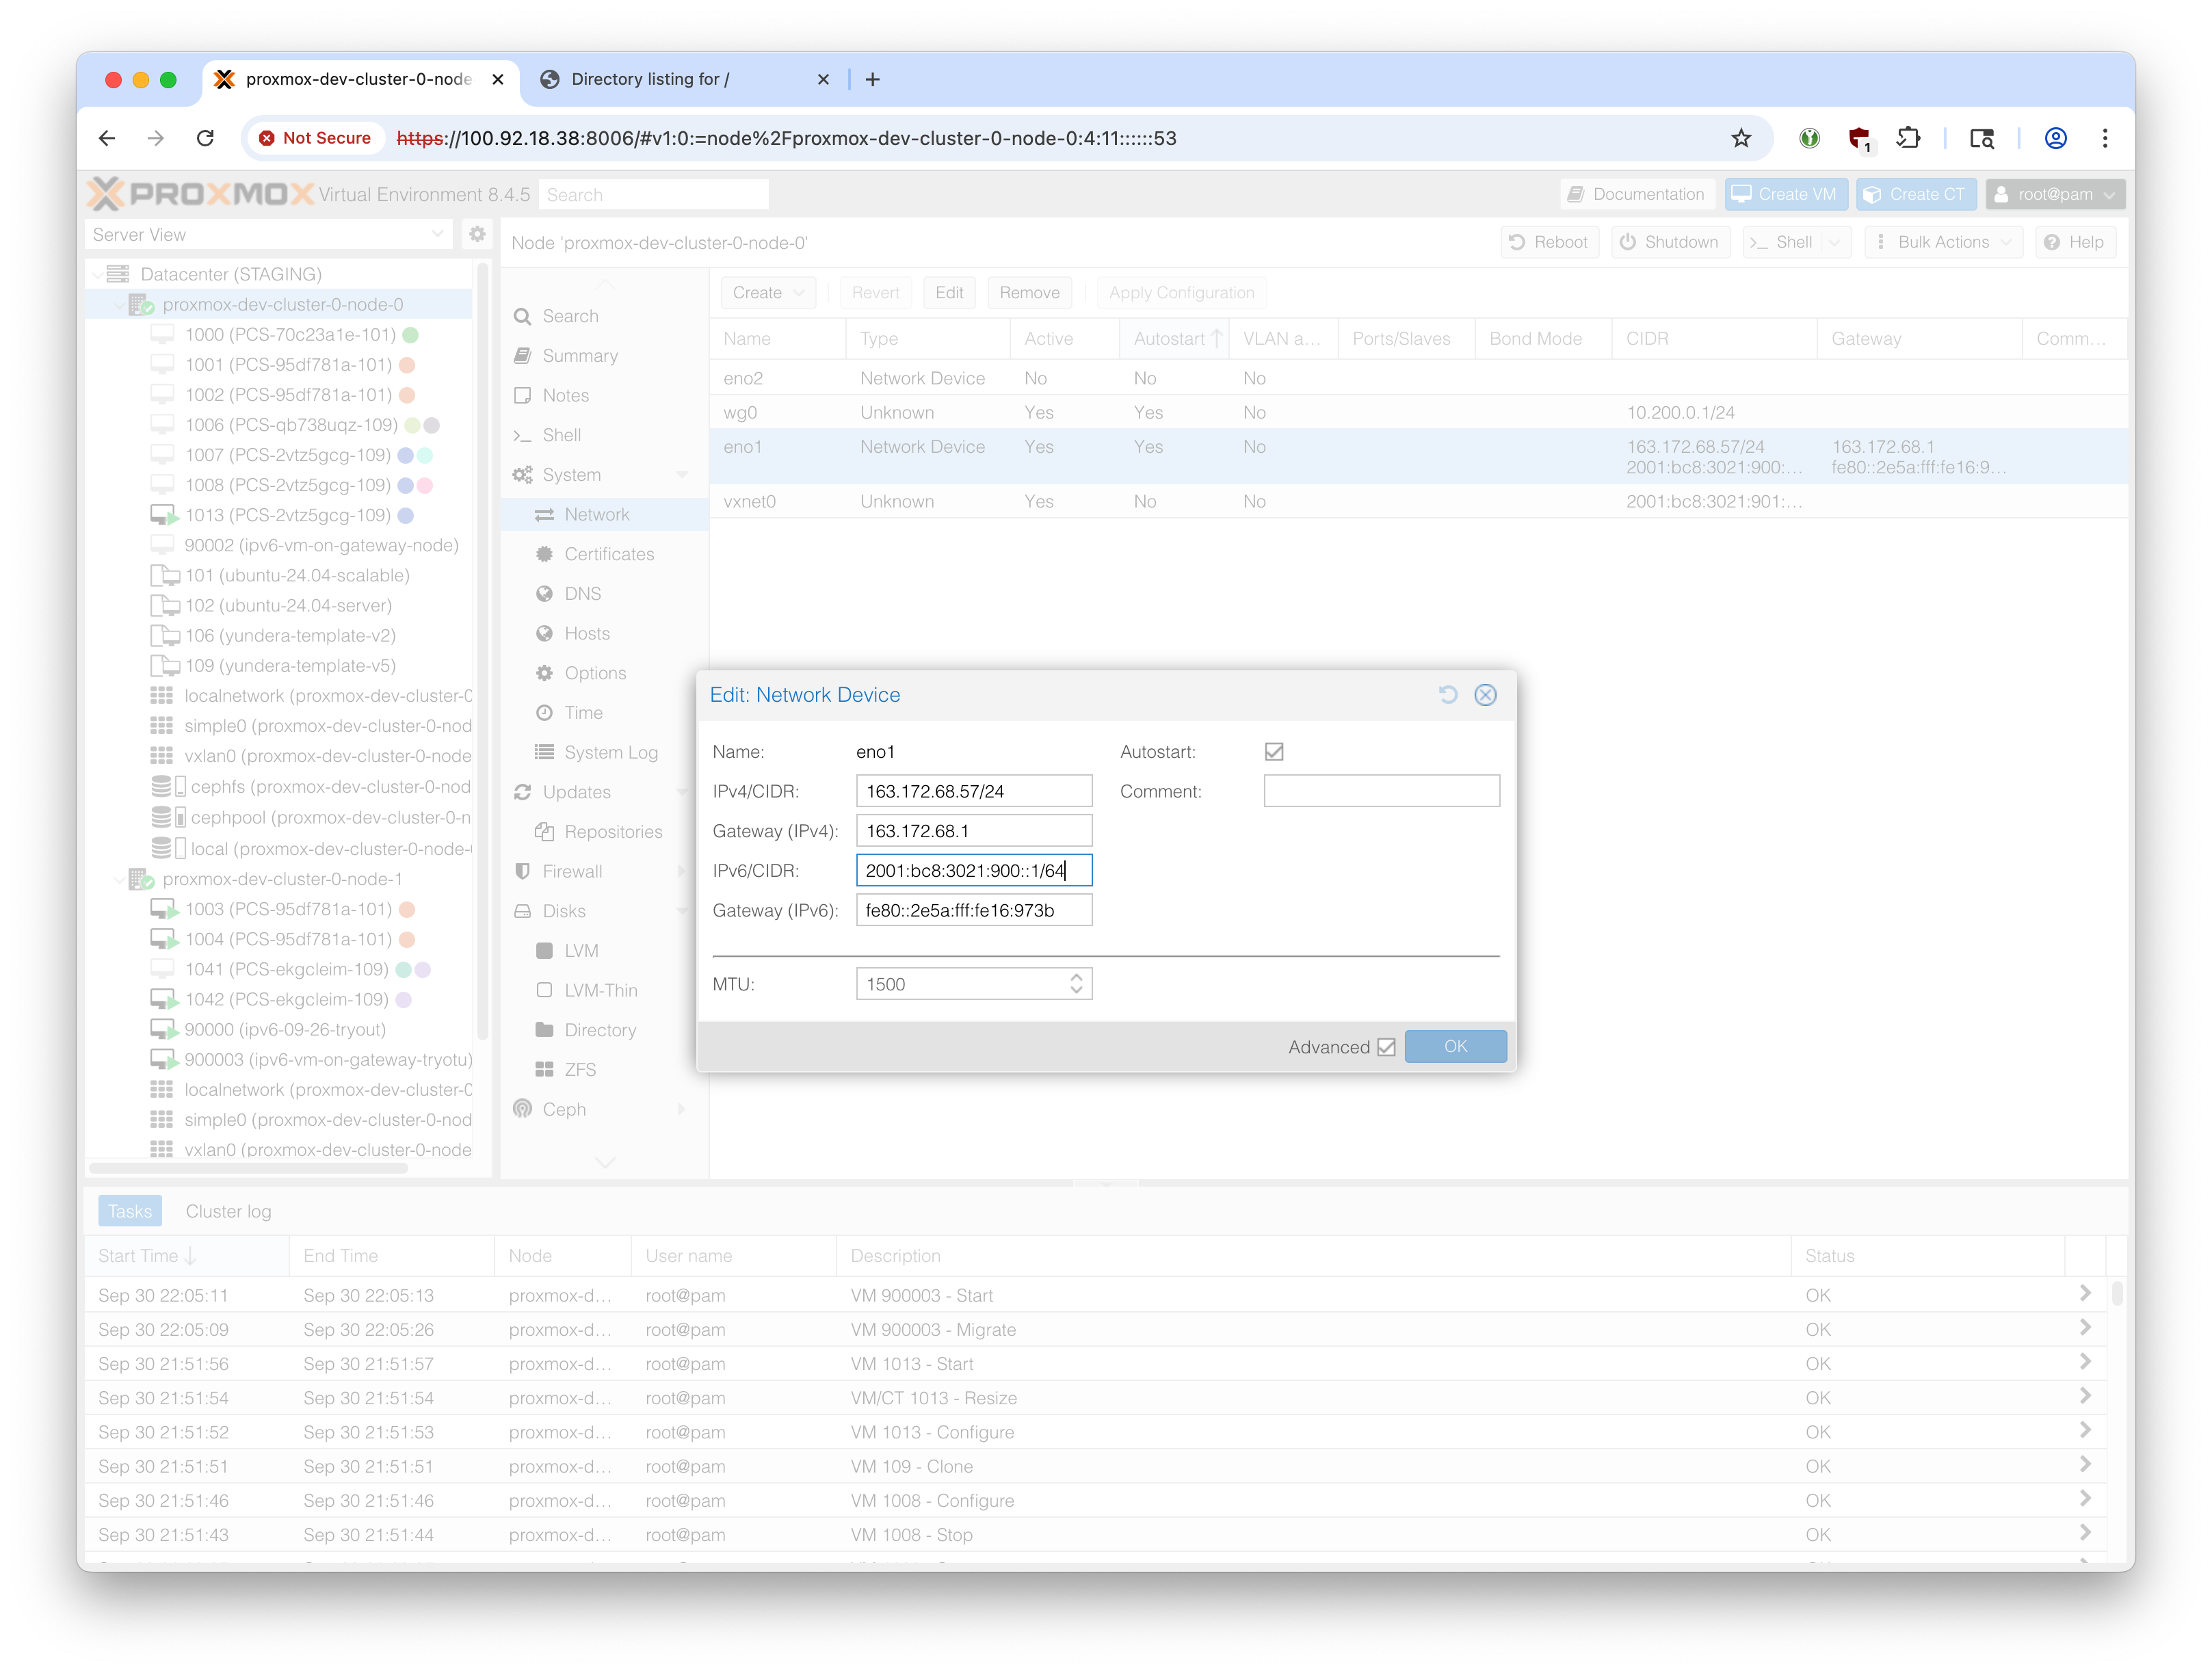
The manual alternative method is:
In /etc/network/interfaces, add:
iface eno1 inet6 static
    address 2001:bc8:3021:900::1/64
    gateway fe80::2e5a:fff:fe16:973b
Reload network configuration:
ifreload -aConfirm that we have IPv6 connectivity to the internet:
ping6 ipv6.google.com3. Enable IPv6 Forwarding
Since this gateway host serves as a router, we need to enable IPv6 forwarding:
echo "net.ipv6.conf.all.forwarding=1" >> /etc/sysctl.d/99-ipv6-forward.conf
echo "net.ipv6.conf.default.forwarding=1" >> /etc/sysctl.d/99-ipv6-forward.conf
Check that it’s been saved:
sysctl -p /etc/sysctl.d/99-ipv6-forward.conf4. Configure Cluster-level SDN
About Addresses
For the client VM address, we are selecting the second /64 available (2001:bc8:3021:901::/64) for two reasons.
1. SLAAC requires /64 subnets.
2. By convention, the first /64 block is kept for management and infrastructure.
Instructions
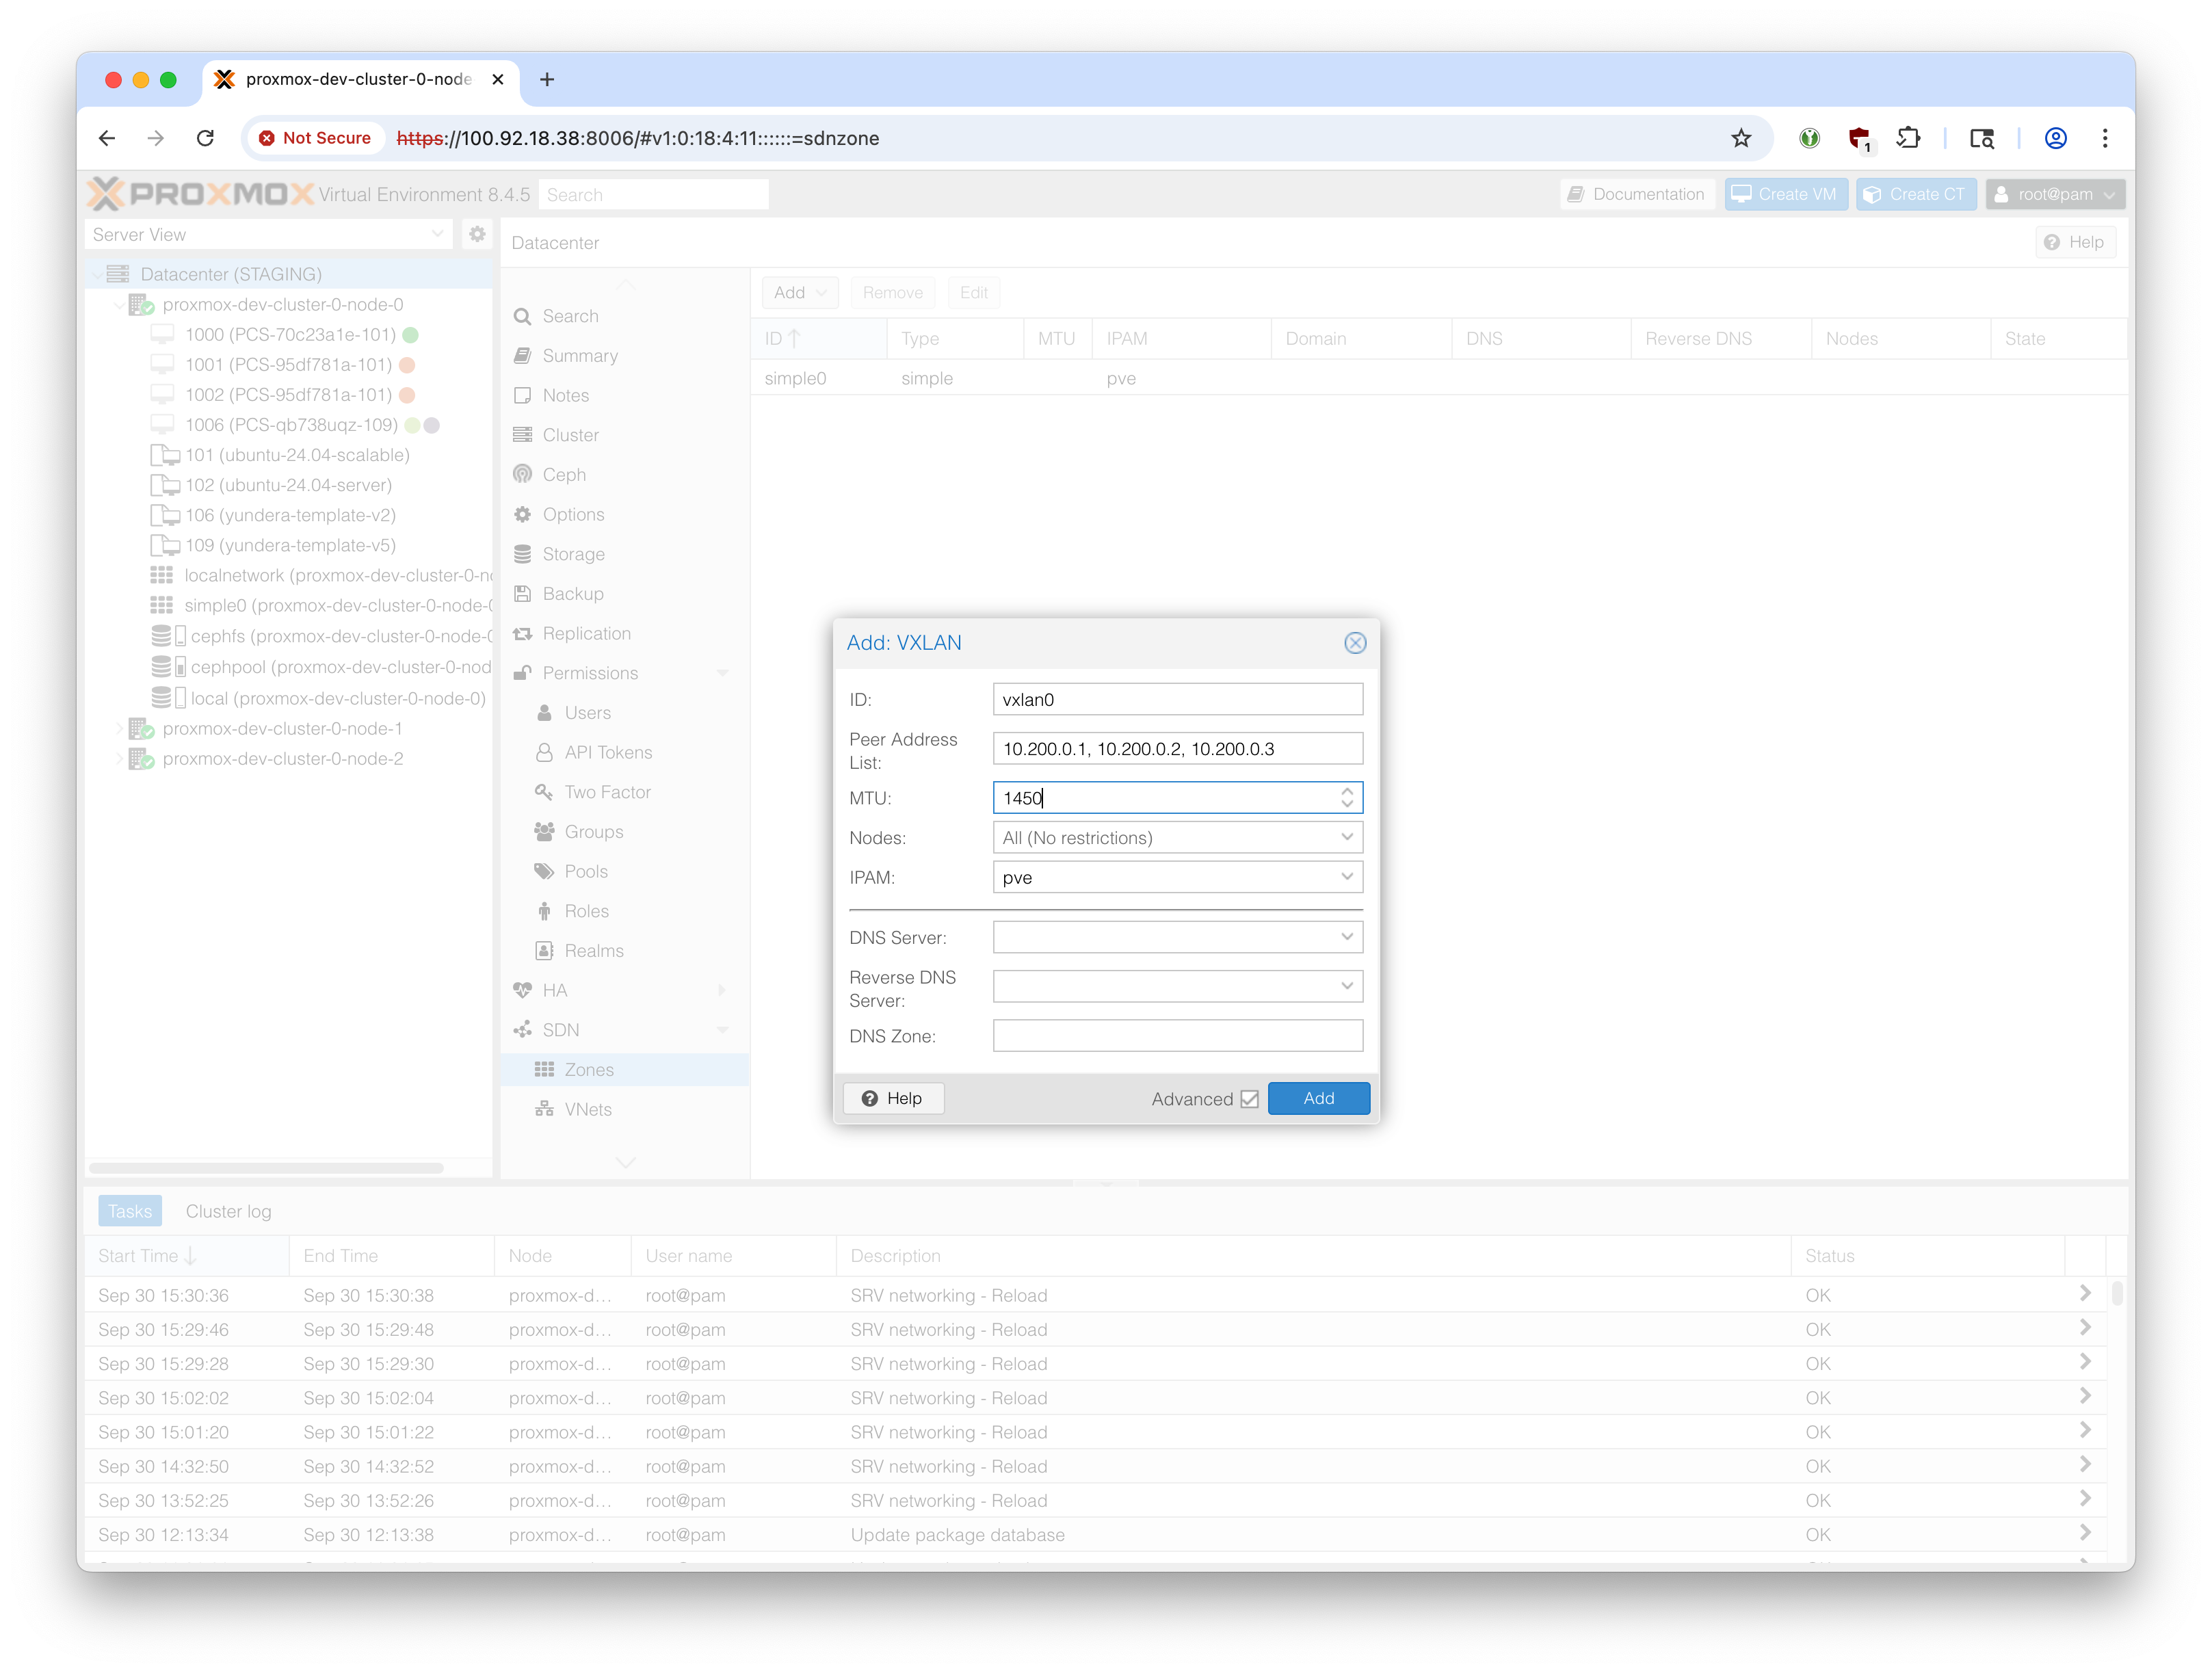
In Proxmox web UI, go to ‘Datacenter’ -> ‘SDN’ -> Zones.
Create a new Zone with the type ‘VXLAN’.
We used ‘Simple’ zone for IPv4 stack, which made configuration relatively easy. However, the ‘Simple’ zone type blocks certain types of traffic from travelling across the cluster between nodes, which prevents it from being used for our single-gateway IPv6 setup. Therefore we use the more intricate ‘VXLAN’ zone type.

- ID: Your choice (
vxlan0in this example)
- Peer Address List: The intra-cluster IP of the Proxmox nodes. For the STAGING cluster, we use wireguard to simulate the RPN that is available on the production cluster. In this example, the three servers’ wireguard IPs are:
10.200.0.1,10.200.0.2,10.200.0.3
- MTU: 1450 (to account for VXLAN overhead)
- Leave the DNS related fields empty.
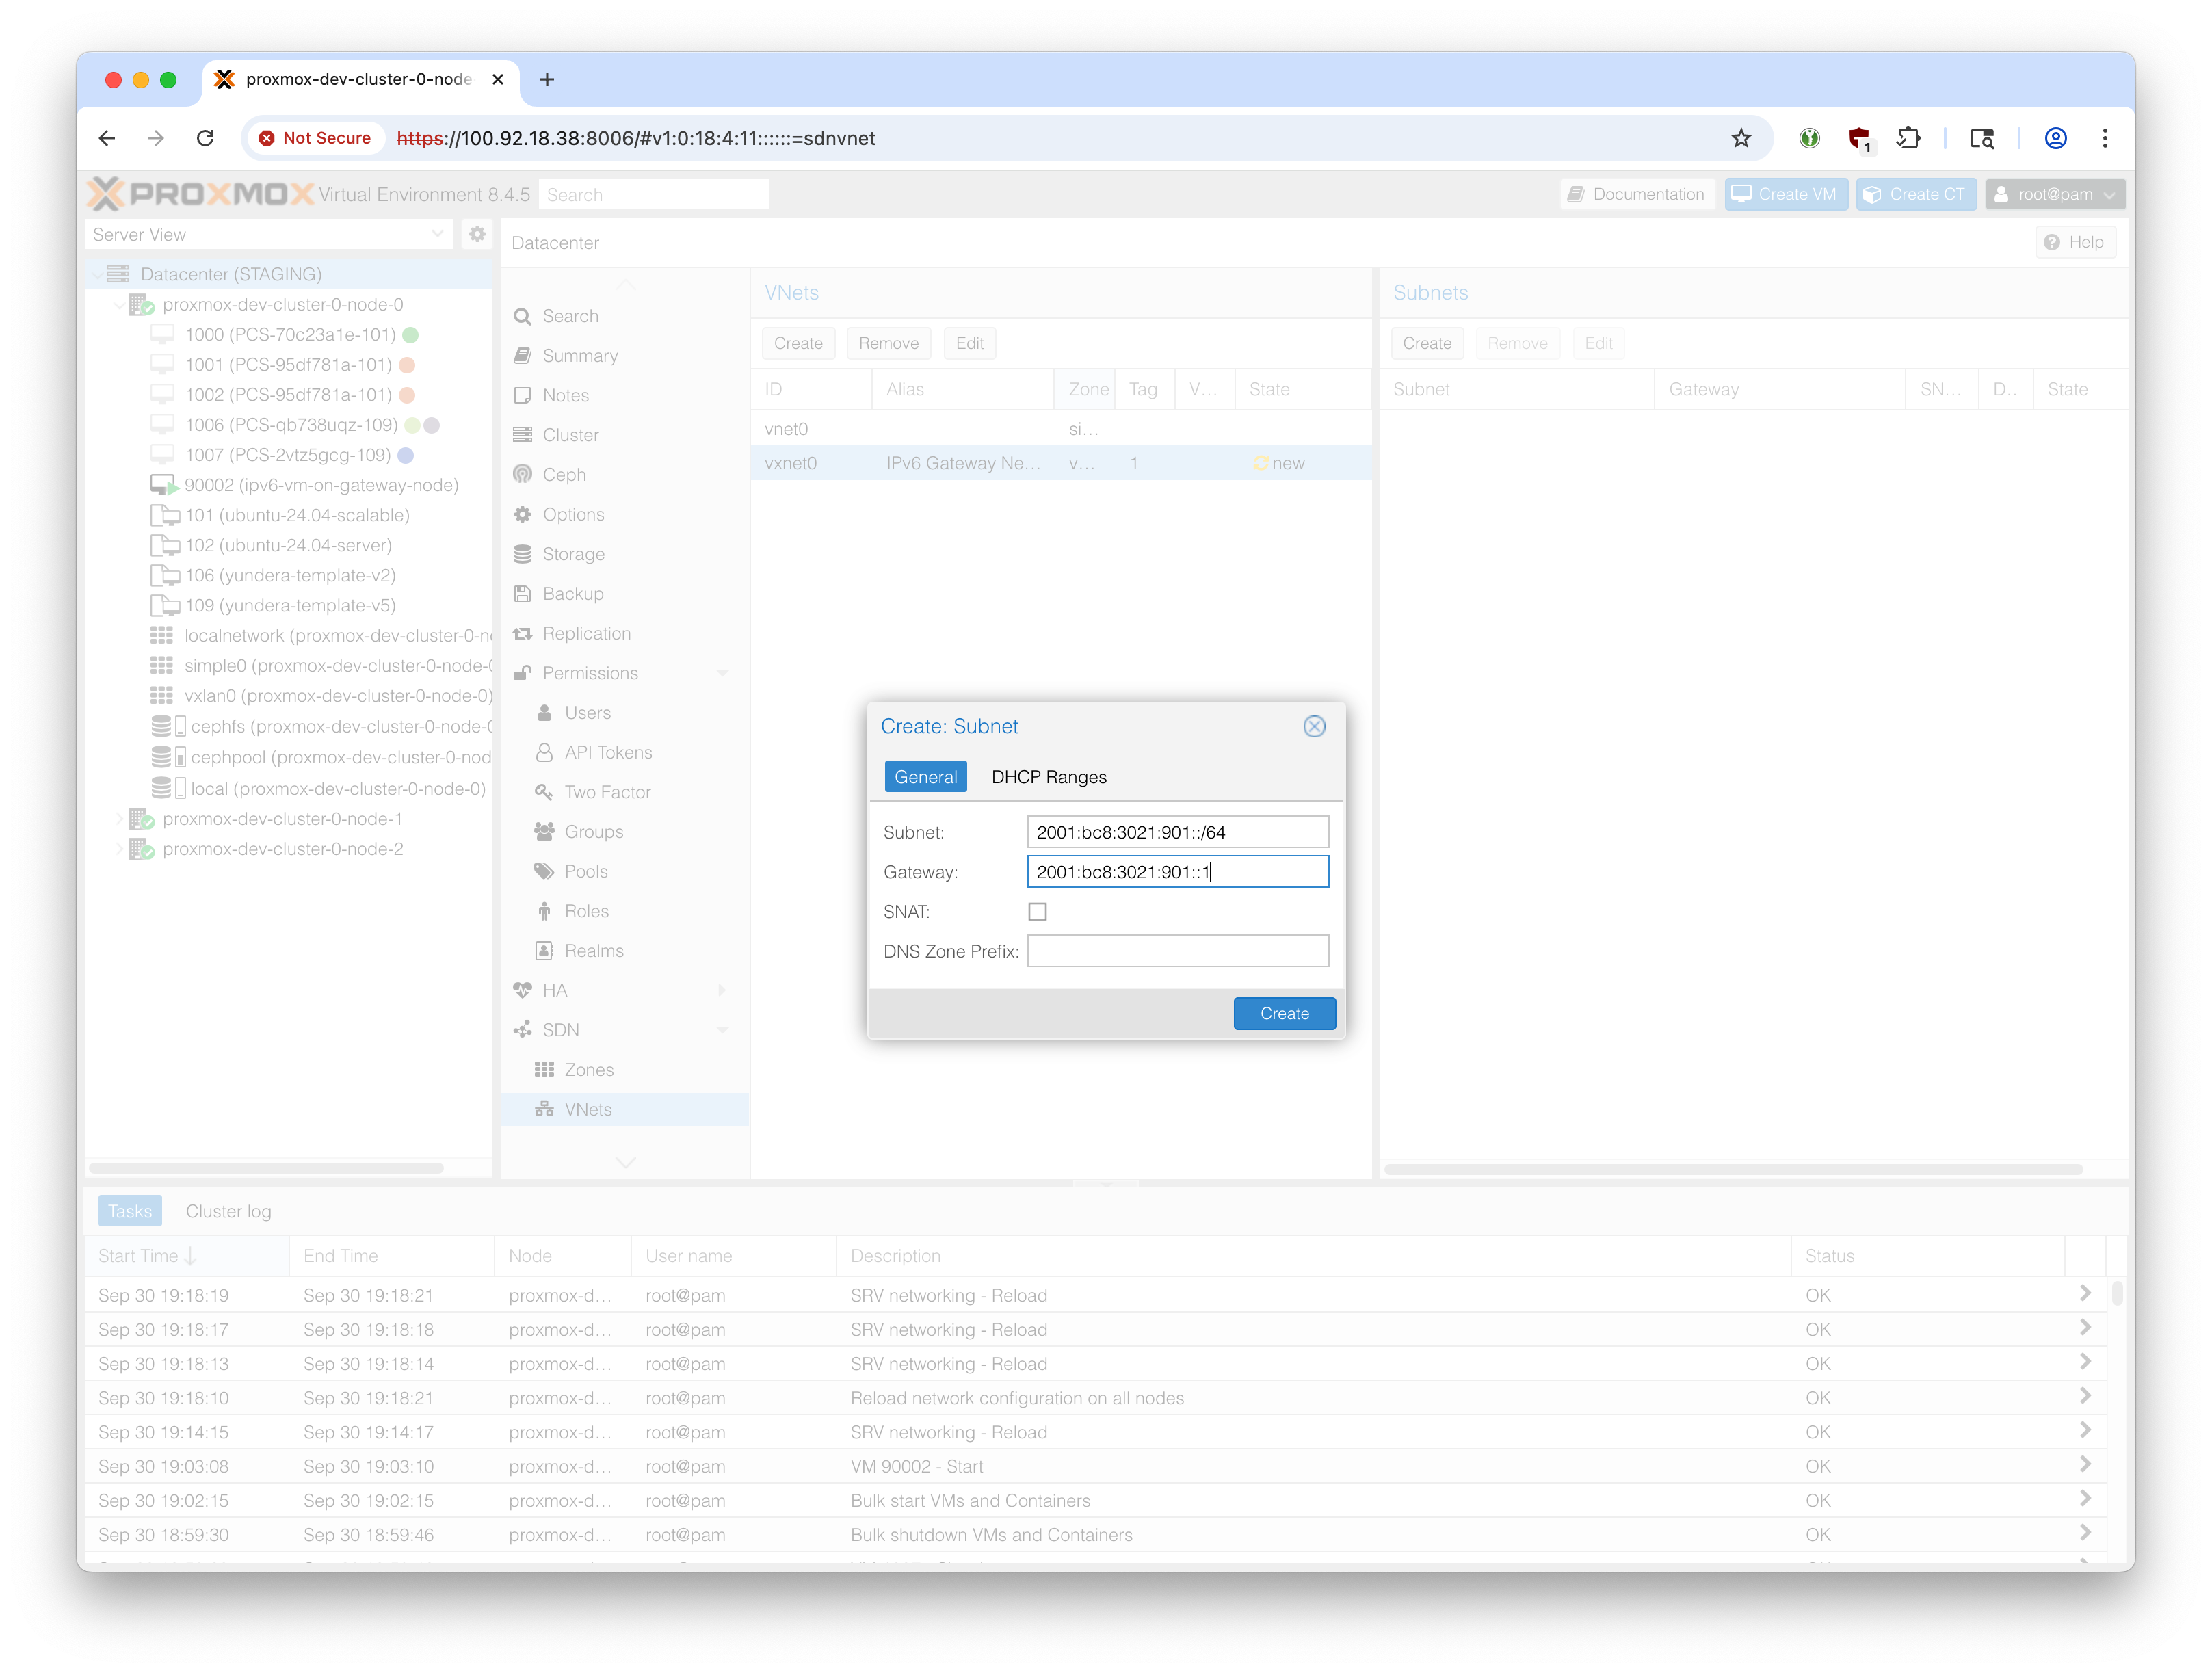
Create a new VNet. Select the zone (in our example, vxlan0) created above. Pick a name and alias of your choice. Select a vlan tag - 1 is fine.

Select the newly created VNet (vxnet0 in our example) and create a subnet.
- Define the subnet as the /64 range that we are using for VMs. (In this example,
2001:bc8:3021:901::/64)
- The gateway should be the IPv6 assigned to this node’s
vxnet0interface. By convention, we make it the first IP on the above /64 range:2001:bc8:3021:901::1in our example.
- SNAT should not be checked.
- Leave DNS Zone Prefix empty.
- Leave DHCP Ranges empty.
Go back to ‘SDN’ and click on ‘Apply’.
4.1 Manually add vxnet0 interface to gateway node
In the previous step, we created a VNet for IPv6 called vxnet0. However, Proxmox SDN does not automatically assign IPv6 gateway addresses, and does not add entries to /etc/network/interfaces for SDN zones.
Since we need to explicitly forward IPv6 requests coming from vxnet0 (from other nodes on the cluster) to eno1 and out to the internet, we need to manually create this entry in /etc/network/interfaces:
Use the address that we defined as the gateway in the previous step. In our example, 2001:bc8:3021:901::1.
iface vxnet0 inet6 static
    address 2001:bc8:3021:901::1/64
    dad-attempts 0
Reload network configuration:
ifreload -a5. IPv6 Forwarding
IPv6 Packets will arrive at node-0 from the other nodes. IPv6 forwarding needs to be enabled for node-0 to forwards these requests back out to the router. IPv6 forwarding enables these packets to transfer across network interfaces.
# Check IPv6 forwarding statussysctl net.ipv6.conf.all.forwarding
sysctl net.ipv6.conf.eno1.forwarding
If either returns 0, enable forwarding with:
# Enable forwardingecho "net.ipv6.conf.all.forwarding=1" >> /etc/sysctl.d/99-ipv6-forward.conf
echo "net.ipv6.conf.default.forwarding=1" >> /etc/sysctl.d/99-ipv6-forward.conf
sysctl -p /etc/sysctl.d/99-ipv6-forward.conf
6. Install radvd
From this point onwards, this gateway node will act as a router.
The radvd package
apt update && apt install -y radvdEdit its configuration file at /etc/radvd.conf:
{
    AdvSendAdvert on;
    MinRtrAdvInterval 3;
    MaxRtrAdvInterval 10;
    AdvManagedFlag off;    # No DHCPv6 for addresses
    AdvOtherConfigFlag off; # No DHCPv6 for other config

    prefix 2001:bc8:3021:901::/64
    {
        AdvOnLink on;
        AdvAutonomous on;   # Allow SLAAC
        AdvRouterAddr on;
    };

};
Modify the prefix value to the /64 subnet address that we are using for the VMs.
Enable and start the service:
# Enable and start radvdsystemctl enable radvd
systemctl restart radvd
# Check statussystemctl status radvd
7. Enable Routing Between Interfaces
Replace vxnet0 with the name of the VNet created above, and eno1 for the internet-facing network interface on the host.
# Enable routing between vxnet0 and eno1ip6tables -A FORWARD -i vxnet0 -o eno1 -j ACCEPT
ip6tables -A FORWARD -i eno1 -o vxnet0 -m state --state ESTABLISHED,RELATED -j ACCEPT
# Check the rules were addedip6tables -L FORWARD -v -nWe should see something like:
Chain FORWARD (policy ACCEPT 0 packets, 0 bytes) pkts bytes target     prot opt in     out     source               destination
32761 2942K ts-forward  0    --  *      *       ::/0                 ::/0
    0     0 ACCEPT     0    --  vxnet0 eno1    ::/0                 ::/0
    0     0 ACCEPT     0    --  eno1   vxnet0  ::/0                 ::/0                 state RELATED,ESTABLISHED
Make these rules persistent:
apt install -y iptables-persistentAnswer YES to saving current rules.
If it doesn’t ask, or if you installed this previously, save the rules manually:
ip6tables-save > /etc/iptables/rules.v6At this point, this node is fully configured as the IPv6 gateway. It ‘owns’ the delegated /56 prefix, and runs a RA (router advertisement) service that allows downstream VMs and machines to have a public IPv6 address within a /64 prefix (within the /56 prefix) using SLAAC.
VM on Gateway Node
Before we continue to setting up the other nodes, let’s do a simple check that a VM hosted on the gateway node is able to get IPv6 connectivity.
1. Clone from a basic template
Recommended template: ubuntu-24.04-server.
For this demonstration, any modern Debian/Ubuntu VM image will work.
Create/clone a Debian/Ubuntu VM on the gateway node.
Before starting the VM, go to Hardware -> Add -> Network Device

Select the vxnet0 bridge, or whatever you called the IPv6-dedicated VXLAN subnet.
Select 1 for MTU to inherit the 1450 bytes MTU (see above)
Now you will see two network devices, net0 for ipv4 and net1 for ipv6.
Start the VM.
Since the IPv4 should already be working, we can SSH into it from the node.
(SSH into the node first, and then SSH into the VM from that tunnel)
Use the IPv4 address shown in the ‘IPs’ section of the VM Summary.
ssh pcs@10.0.10.17When you run ip link, you will see that ens19 is DOWN. This is interface corresponding to the IPv6 interface that we just added newly. Therefore we need to enable this.
(The names might differ depending on your OS)
pcs@yundera:~$ ip link
1: lo: <LOOPBACK,UP,LOWER_UP> mtu 65536 qdisc noqueue state UNKNOWN mode DEFAULT group default qlen 1000
    link/loopback 00:00:00:00:00:00 brd 00:00:00:00:00:00
2: ens18: <BROADCAST,MULTICAST,UP,LOWER_UP> mtu 1500 qdisc fq_codel state UP mode DEFAULT group default qlen 1000
    link/ether bc:24:11:f2:29:2b brd ff:ff:ff:ff:ff:ff
    altname enp0s18
3: ens19: <BROADCAST,MULTICAST> mtu 1450 qdisc noop state DOWN mode DEFAULT group default qlen 1000
    link/ether bc:24:11:a0:f5:e7 brd ff:ff:ff:ff:ff:ff
    altname enp0s19
Edit /etc/netplan/50-cloud-init.yaml to add the line for ens19.
network: version: 2 ethernets: ens18: dhcp4: true ens19: dhcp4: false dhcp6: false accept-ra: trueCommit the changes:
sudo netplan applyCheck that a public IPv6 address has been assigned (would have been through SLAAC)
pcs@yundera:~$ ip -6 addr show ens19
3: ens19: <BROADCAST,MULTICAST,UP,LOWER_UP> mtu 1450 qdisc fq_codel state UP group default qlen 1000
    altname enp0s19
    inet6 2001:bc8:3021:901:be24:11ff:fe8f:cbca/64 scope global dynamic mngtmpaddr noprefixroute
       valid_lft 86393sec preferred_lft 14393sec
    inet6 fe80::be24:11ff:fe8f:cbca/64 scope link
       valid_lft forever preferred_lft forever
The inet6 2001:bc8:3021:901:... shows that indeed a public IP address has been assigned.
After some basic clean up, this VM can be saved as a template and it is expected to work through the cluster.
Note that in the VM Summary, you need to click on ‘More’ to see the public IPv6 address on ens19.
Other Nodes Setup
Above, we configured the single node on our Proxmox cluster to serve as the IPv6 gateway.
All other nodes need to send IPv6 requests through the cluster-wide VXLAN to that gateway node. This section covers configuring these other non-gateway nodes.
SSH into each node and follow these instructions:
1. Check vxnet0 exists
Check if vxnet0 exists:
ip link show vxnet0This should return something like:
root@proxmox-dev-cluster-0-node-1:~# ip link show vxnet0
123: vxnet0: <BROADCAST,MULTICAST,UP,LOWER_UP> mtu 1450 qdisc noqueue state UP mode DEFAULT group default qlen 1000
    link/ether 5e:39:2f:ca:30:ca brd ff:ff:ff:ff:ff:ff
    alias IPv6 Gateway Network
Just confirm that it’s UP.
3. Configure Network
Enable IPv6 forwarding
echo "net.ipv6.conf.all.forwarding=1" >> /etc/sysctl.d/99-ipv6-forward.conf
echo "net.ipv6.conf.default.forwarding=1" >> /etc/sysctl.d/99-ipv6-forward.conf
sysctl -p /etc/sysctl.d/99-ipv6-forward.conf
Add the following lines to /etc/network/interfaces, being careful to enter the three IP addresses correctly according to your setup.
# IPv6 routing through node-0# Remove comments from below (they will cause syntax errors)auto vxnet0
iface vxnet0 inet6 static
    # This node's link-local address for vxnet0. Different for each node. Find with `ip addr show vxnet0`. Starts with fe80:...    address fe80::d063:acff:fe2a:1127/64
    # The /64 subnet block for VMs. Same for all nodes.    post-up ip -6 route add 2001:bc8:3021:901::/64 dev vxnet0
    # Gateway node's link-local address on vxnet0. Find by running `ip -6 addr show vxnet0` on the gateway node. It starts with fe80:.... Same for all nodes.    post-up ip -6 route add default via fe80::84d9:b0ff:fef0:eb2a dev vxnet0
Just a friendly reminder: Since all IPv6 requests will go through the vxnet0 and then through the gateway node, these non-gateway nodes should not have a IPv6 configured on the eno1 interface.
Reload network configuration:
ifreload -aWait several seconds for the default route to be set.
Finally, verify routes:
ip -6 route showKey lines:
2001:bc8:3021:901::/64 dev vxnet0 metric 1024 pref medium: Route to 2001:bc8:3021:901::/64 via vxnet0
default via fe80::8c11:f1ff:fedc:875d dev vxnet0 metric 1024 pref medium: Default IPv6 route pointing to node-0’s link-local address
Repeat this for all other nodes.
Final Testing
At this point, cluster-wide SLAAC based public IPv6 connectivity for all client VMs is complete.
We can first test by migrating the VM created beforehand which exists on the gateway node to a different node. We expect it to work seamlessly and live.
Run an example server
A basic way to test incoming IPv6 connection is by running a python file server on the VM:
Navigate to a directory with some dummy files (no sensitive information) and run:
python3 -m http.server 8000 --bind ::Run it in a tmux terminal and observe that the file server continues to work even as you migrate the VM across nodes:
tmuxThen run
python3 -m http.server 8000 --bind ::Detach tmux: Ctrl-B, then ‘D’.
Get the public IPv6 address:
curl ident.meSuppose it returns 2001:bc8:3021:901:be24:11ff:fe8f:cbca.
Observe that the web server is working at http://[2001:bc8:3021:901:be24:11ff:fe8f:cbca]:8000
(Put the IPv6 address in brackets and then the port 8000)
Migrate the VM to a different node using the Proxmox web UI.
Observe that the web server continues to work at that address.
Helpful Tips
Messing with the networking can temporarily disconnect the server from the cluster.
Restart these two services:
systemctl stop pve-cluster
systemctl stop corosync

systemctl start corosync
systemctl start pve-cluster